![]()
Welcome to the Modeler's Gallery |
|
||||
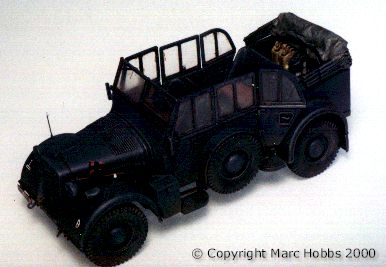
Italeri Horch Command Car SdKfz 15 - Final AssemblyBecause of all the nooks and crannies, I painted the body and chassis separately with Model Master Panzer Gray. I had left off the doors until the final assembly because I wanted to show them opened and I was going to attempt to build my own hinges. This became the most involved step in the construction, but after much trial and error, here is a technique that seems to work:
Next I cut two pieces of plastic to represent the faces of each hinge. Using the
Formula 560, I glue one piece of the hypodermic tube to each piece of plastic (at this
point the copper core is only glued to the top half of the hypodermic) and you have a
working hinge. Then you just mount two hinges to each door and add a At this point I added all those small pieces that had been left off from the previous steps. I replaced the front windscreen with clear acetate for more thinness. The shovel does not fit quite right, so I added a spacer made of sheet plastic to the bracket around the blade. The lids to the side stowage boxes have some fit problems, so a little filling and sanding was necessary. I added wiring for the headlights, horns, turn signals and windshield wipers from thin solder and replaced the Notek light with one from the Pz IV set. I replaced the front clearance markers and commander's pennant with ones made from wire and plastic and I added a small plastic disc to front where the hand crank engages the engine (Italeri gives you a hole, so I'm assuming the example they modeled is missing this cover). Also I replaced the grab handles on the interior with new ones made from solder. You just bend them to shape, flatten the ends and attach them with a drop of Zaparts This is easier than removing the mold seams and the parts retain their round shape. As noted earlier, the accessories are a little rough, so I replaced the three Jerry cans with cans from the new Tamiya German Fuel Drum Set, and I replaced the hand crank with one from the Panzer IV On Vehicle Equipment Set. The last step of construction was building the folding canvas toparts The kit provides a top in the employed position and one neatly stowed and secured. I wanted to show the top down but not stowed. In the field you rarely see a top neatly stowed and none of the pictures in my references show the top properly put away; it is generally just folded down and pushed out of the way in a rather random fashion. So of course, this is what I had to model. I considered borrowing the top from the Tamiya Steyr 1500 kit, but it is too wide.
FinishingThe painting technique that works best for me is a five-step process.
Overall this was a great kit to build. I am quite pleased with the finished product and I wouldn't say requires any special effort to get a good result. It is definitely one of the best kits available from Italeri and for $16; it's a great value. ReferencesFor reference I used the excellent German Personnel Cars in Wartime published by Schiffer Publishing Ltd. This book is the best reference I found for detailing. Unfortunately, the pictures are not reproduced very clearly, so you really have to study them. While you can find photographs of these vehicles in almost any book about the German Army in WWII, I also found Panzer Colors Vol. I, II and III by Bruce Culver to be particularly helpful. The photographs are reprinted much more clearly and these books provide a wealth of information on painting and marking the vehicle. Another excellent source of "in service" photographs is the three volume set "Waffen SS" published by Concord Publications. The instructions state the kit is a replica of an example in the "Deutsches Museum" in Munich. It measures out accurately to the specifications in my references. Italeri has done a really nice job capturing the shape and look of this vehicle. It is quite possible to build this kit straight from the box and have a very nice model. However, if you like to add detail, there is still a lot you can do with this kit. Because I like to add my own personal touch to a model, I opted to take the detailing route. I guess its kind of like marking my territory. |
|
||||
Copyright 2000 -
Austin Armor Builders Society
All rights reserved.
Web design and maintenance:
Andrew Martin Web Design